
Electrode Extension Wire Pack Reloading Instructions
Notes
To prepare a fresh wire roll, burn the insulation off the “tail” or inner winding of the wire roll and then release the free end for threading through the machine.
As the wire unspools off one end of the spool, the wire rubs around the spools upper rim so you must be careful that there are no nicks, cracks or tape on this rim that could snag the wire as it slips by.
Open the box by releasing the metal draw clasp on the top of the box. The outer side will hinge open by 90 degrees. Inside, note how the roll of wire sits on the floor of the box, gripped by it’s lower rim.
The replacement roll needs to be fully inserted into the curved rim gripper or the box may not close. The door side of the box also hooks over the rim so as it closes. You may feel it push the roll into place.
Use the red screw terminal to connect the “tail” of the roll and tighten it securely for a good electrical connection.
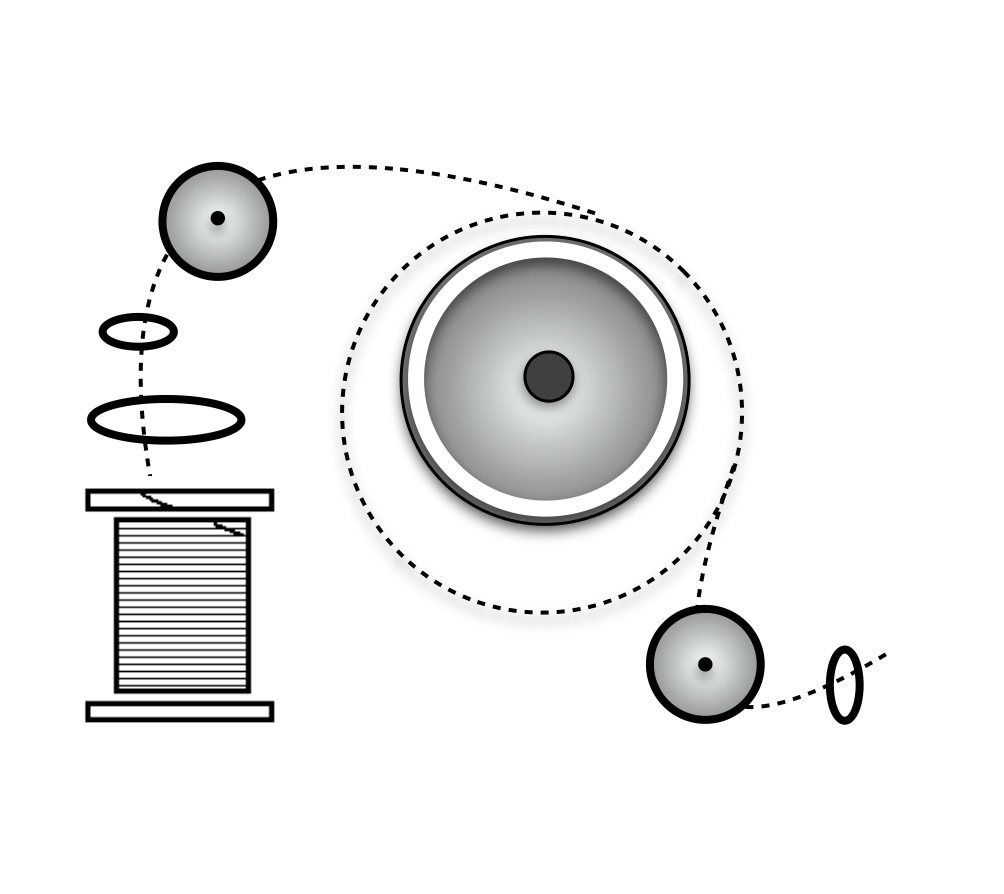
There is a diagram below showing the loading path. Here it is in text.
The free end of the wire passes first through the brass ring above the roll and then across to the door side where there is a guide below the first tensioner.
Then the wire makes a 90 degree turn around the tensioners’ centre post between the tensioning pressure disks.
Wind the wire one full turn around the measuring wheel. Then pass it through the second tensioner and out the final guide.
A snagging washer is provided on the outside of the case to tie off the loose end of the wire when not in use.
-Close the box while pulling out the extra wire which was stretched between the two sides. The wire should then pull smoothly off the roll. Close the box catch, reset the counter to zero by turning the yellow reset knob. Your electrical instrument plugs into the socket on the top.
The tensioners are adjustable but they should be set very lightly so that the wire pulls out easily without stripping off the insulation. The small guide rings are easily replaced if they show signs of wear. For replacement parts, service or help, contact us and we will be happy to answer any questions you might have.

Many users of Fremaco’s cathodic survey wire dispenser or “Wire Pack” have found they prefer to mount this unit grouped together with their other instruments and equipment. To facilitate this there are several mounting holes in the back of the unit. The standard belt clips can be removed to make these holes available.
As seen in the diagram below, there is a vertical groove that helps to locate the body of the wire pack against a vertical pole or probe.
Also provided are large holes in the base to act as anchoring points for stretch cords.
In order to have more stretch available in these short cords, the cords should pass through the large side holes and be anchored in the holes in the floor where the wire reel sits.
With the hook removed on one end of the stretch cord, that free end can be fixed into the floor hole by adding a nylon wire tie wrap.
Make sure the tie wrap does not interfere with the free unspooling of the wire spool.
Warranty and Service
These Fremaco products carry a 1 year warranty against defects in materials or workmanship. If you are returning a product to us for servicing, please read this page carefully.